Dip Casting and coating is a thermofusion process in which a hot metal mold or objects is dipped into a room temperature liquid plastic. This process may also be called dip molding. Since the plastic used is commonly a vinyl plastisol, it is the resin material needed for the following laboratory experiment. The experiment will result in the fabrication of vinyl coatings and moldings for various products such as tool handles and cleaning gloves. Vinyl plastisol is a material of choice since various hardnesses may be used to produce the resulting product. Hardness is controlled by the amount of plasticizer added to the vinyl. The heated mold is dip into the plastisol. When a layer of plastic is built up, the mold is taken out of the liquid plastic. The mold with the layer of plastic on it is then put in a pre-heat oven. The plastic is completely fused and smoothed in the oven. The fused part is then cooled by water and removed from the mold, the process is called dip molding. Cleaning gloves and coin purses are made by dip molding, since they need to be removed from the mold. When the fused plastisol is left on the part permanently, the process is called dip coating. Tool handle grips are made by dip coating, since they need to stay on the molds (tool handles) permanently.
Purpose:
The purpose of this laboratory experiment is to demonstrate the processes involved in dip molding and dip coating of various products such as tool handle grips, cleaning gloves, and coin purses. The required materials and equipment are listed below.
Materials Needed:
- Various aluminum molds or other objects to dip.
- Plastisol material for dip casting or coating.
- Pail of water for cooling off the cured part.
- Color pigments (optional).
Equipment Needed:
- Pliers.
- Insulated gloves.
- Heating oven (Blue-M Oven ).
- Empty can for storing the mixed plastisol.
- Paint paddle or blade for mixing the plastisol.
- Metal rod for hanging the mold in the oven.
- Knife and straight edge for removing the cured part from the mold in case of dip molding.
Operation Sequence:
- Mix the plastisol well with paint paddle. If necessary add color pigments and mix again.
- Remove the air bubbles from the plastisol by letting it stand 24 hours.
- Cut the metal rod to appropriate length and bend it ("s" shape) so that the mold can be hanged in the oven.
- Preheat the metal handle for about 20-30 minutes at 350 F (177 C) (See fig. 1 below). If using the Blue-M Oven, click on the link (above) in #3 of the equipment needed for operating instruction. Also, check the manufacture's instructions (on the cans of plastisol) for exact time and temperature.
- Put on insulated gloves. Take a mold from the oven with a pair of pliers.
- Dip the mold or object in the plastisol for about 1.5 minutes (See fig. 2 below). Do not touch the sides of the plastisol can with the mold. Let the plastisol stop dripping before returning the mold to the oven.
- Put the dipped mold back in the oven to cure. Cure (fuse) the plastisol about 15 minutes at about 350 F (177 C). Check manufacture's instructions for exact time and temperature.
- Put on insulated gloves. Take the mold from the oven with a pair of pliers.
- Put the cured part and mold in cool water. Cool it for about 10 minutes.
- If making a coin purse, cut around the wire ends with a sharp knife then cut a slit from end to end with a straight edge and a sharp knife.
- Carefully slip the part off the mold.
Safety:
- Always use gloves and pliers to handle hot molds.
- Always cool the plastisol and mold long enough to keep from getting burned when removing the part from the mold.
- Always read the labels and any instructions on the cans of plastisol.
Source:
Steele, l. Gerald (1977). Exploring The World of Plastics. Illinois: McKnight Publishing Company.
Chhakrya Lam
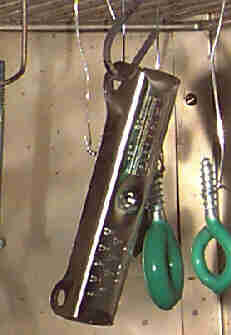
Fig. 1. Preheat the mold or object in the Blue-M Oven.
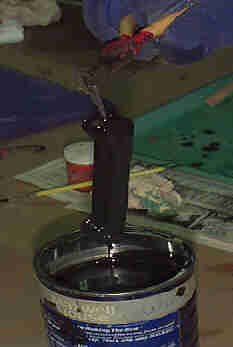
Fig. 2. Dip the hot mold or object in the plastisol and let it stop dripping before returning it back to the oven.